
Forging a Custom Made Knife
Forging a Custom Made Knife is the process of forming metal after heating it to forging temperatures. This can be accomplished with a fire typically controlled by air. It’s then formed by hitting it with hammers or presses. These can be blacksmith hammers, power hammers, hydraulic presses, or other means.
There is not one definitive way to Forging a Custom Made Knife, and different Smith’s will have different methods and opinions, but a few basic rules will help guide you.
I’ve tried to give detailed instructions with the knives I forge.
Being able to forge is not a requirement for knife making but it can have a place in any knife making hobby if one chooses. There are many knife makers who never forge and make beautiful knives. You can decide at what point, if any, you’d like to add forging to your skill set.
No matter how much you forge, or how good you get at it, there will always be stock removal involved. So, you can forge and file, or forge and grind, either way, you’ll need to remove some stock to finish your knife.
If you have experience forging already, then the stock removal become a bit easier. However, if it is yet another skill you need to learn, then start slow.
You will often hear that forging a knife has less metal waste than stock removal. You will need to stop and think about that for a moment. Look at your design and think about what will be removed compared to the time to forge the knife.
On a basic knife design, and even some more advanced designs, I think the waste is somewhat insignificant. There is the corner snips and the bevel grinds, but for these basic designs, the time you save over forging will make up for it.
However, there are designs that forging will save a lot of metal and a lot of time as well, so working this skill into your learning curve will definitely be a benefit at some point in your knife and edge tool making.
You can stop the forging process and move to stock removal at any point in the process. Starting with just a little forging as you learn and develop, will help add another toolset to your abilities.
Forging is simply the process of heating metal to a working temperature and forming it with a hammer. You don’t need a bunch of fancy equipment to start.
Get a cross peen or rounding hammer and a hard chunk of metal. An anvil is nice to have, but not a requirement. Any heavy solid chunk of hard metal will do. A sledgehammer head or piece of railroad tract are common anvil starters. It’s also a common misconception that you will need to flatten the top of the railroad track, but the curve is quite nice when creating the bevel. If you find the flat easier to use, turn the track upside down, it’s flat on the bottom. You may even like it turned end up.
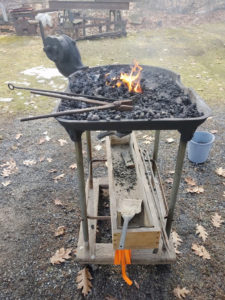
Now you just need a source of heat. This can be anything from a campfire, or a hole in the ground, or a real forge. All will work. If you’re not using a real forge, then adding some air helps a lot. A hair dryer piped in, or small blower of some kind works well.
To begin forging a forge of some kind is needed. The basic options are coal or propane. I currently have both.
I don’t use the coal forge much when Forging a Custom Made Knife. I can’t find a local source for blacksmith coal, and the home heating coal doesn’t perform very well. I Still plan to continue to use it from time to time, but I find the propane much more convenient for what I am currently doing, and propane is much easier to get.
For fuel for a coal forge you should get bituminous coal. Coal for heating is anthracite, which doesn’t work nearly as well. It needs a lot more air. It will work in a pinch, however. Regular barbecue charcoal does not work well either.
I chose to build my propane forge to save some budget. There are two things I’d change if I had to do it over. First, I would have just bought my burners from a reliable source. By the time I bought all the little parts for the burners, the savings compared to just buying the burner didn’t make sense, and I wouldn’t have put a second burner on. I almost never turn the second one on. It wasn’t necessary.
Keep in mind a forge can simply be a hole in the ground with something to provide some air, like a hair dryer. You don’t need to let not having a forge, stop you from trying on your own.
You can also make a very simple forge by stacking some fire brick. Dill a hole for a propane or map torch to go through. There are many examples and instructions available both online and in blacksmithing books.
You can also just use some good hardwood firewood. It takes longer as you need to let it burn to a hot charcoal like fire.
And of course, if you have a coal or propane forge, that is the optimal setup.
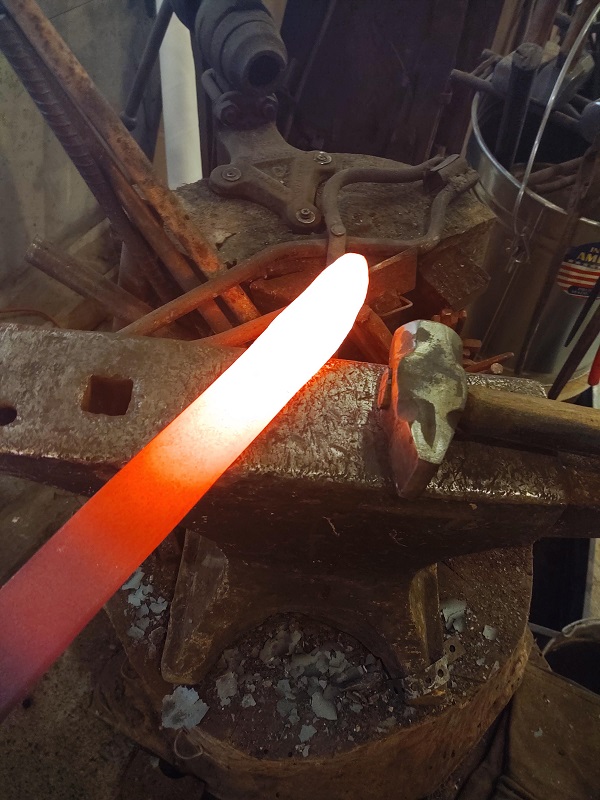
Now just heat the metal to a bright orange, almost yellow color. Using a set of tongs, or long handled pliers, work the metal with the hammer. Heat it often and work from one end of your blade to the other.
This chapter could easily turn into a book itself, so for now we’ll keep it simple. I suggest you start forming the point of your knife then the bevel and then switch to stock removal. After that you can move into other areas. Just keep practicing and researching as you go.
________________
As an Amazon associate, we earn income from qualifying purchases when you click on a link. Your link clicks help us fund our website.________________