
Knife 40 – Fully Forged Hunting knife
This is the first knife I’m going to call forged. I’ll admit it took me longer due to inexperienced, but not as long as I expected. This is an example of one of the benefits of knowing how to forge a knife along with stock removal. This piece of 1080 would not have been big enough to do what I wanted to do using just stock removal. There was plenty of metal, it just needed to be drawn out and shaped.
I started with 1/8” 1080 steel when making “Knife 40 – Fully Forged Hunting knife”. You will want to use a cross peen or rounding hammer. The flat side is for smoothing, the round or peening side is for moving and forming the metal.

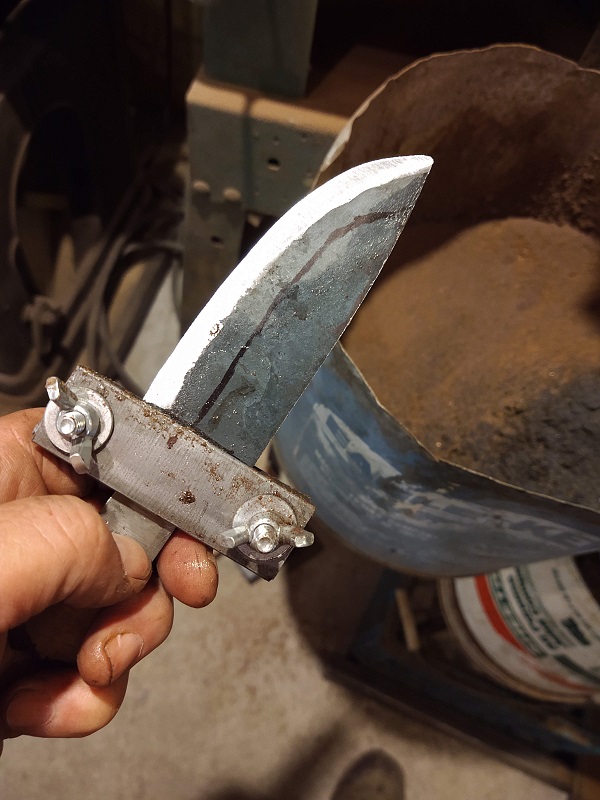
First, I started with the blade. I heated and hammered the blade into the shape I wanted. I started with the bottom curve then alternated between that and the drop point, all the time keeping the knife flat.

I made sure the shape was exactly what I wanted, then moved to defining and drawing out the tang. Again, making sure the knife stayed flat. To define the beginning of the tang I used a combination of the cross peen and the edge of the anvil, using the hammer face to keep it flat as I went.

Once the tang was developed, I started on the bevel. Using the hammer face at a slight angle, I drew out the bevel working from one end to the other on each side. It was actually easier than I anticipated as long as I took my time.

Before stopping I paid extra attention to making sure it was as flat as I could make it and the form was as I expected it to be
I then let it cool and moved to the belt grinder. (I’d you don’t have a belt grinder yet, use what you have, a belt sander, angle grinder, etc.


Using the belt I formed the tang further and evened up the shape. At this point I was using a 36-grit ceramic belt. I decided to try to free hand the bevel, so I added my plunge stop. Slowing the belt down substantially and maintaining a horizontal move. It’s here I discovered it was often best to let the knife slide behind my thumb that was pressing the knife to the belt. Dunking in water served to purposes at this point, it kept the knife cool so I could hold on it and it helped lubricate the knife, so it slides behind my thumb. This allowed me to keep a more even pressure on the bevel. Keeping the belt speed slow enough so the knife doesn’t overheat in a single pass helps a great deal. It’s not a concern for the overheat for the metal, it’s maintaining a temperature you can hang onto.
From here I jumped to 120 grit. In retrospect I should have gone to 80 first. I then moved to hand filing and sanding. There were a few spots I found while hand working that had deep enough scratches that I moved back to the belt to take them out, then back to hand work.

I then made sure the tang had a slight taper from the beginning to the tip. This would allow the finger guard to slide on.
Once this was completed, I moved to making the finger guard. I cut a piece of ¼” x 1” steel. I marked the slot and drilled a series of holes the appropriate size for the tang. I used the mill to finish the cut, but a file or Dremel would have worked as well. I rounded the guard on the belt grinder.

I marked out and cut a piece of aluminum that will be the frame. I cut serrations in it about every ¼” all the way around. This gets cleaned up and roughed up with 80 grit sandpaper to slow the epoxy to stick better.
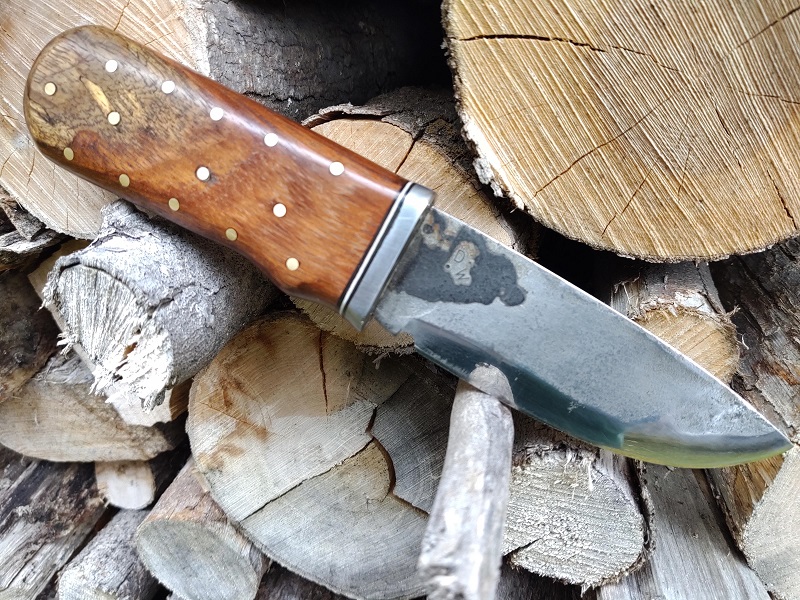
I then cut out two rosewood scales square and slightly oversized and epoxied black spacers to them. I clamped them together with wax paper between them for easy separation.
That was the end of the day. I would estimate I had about 5 hours in this knife at this point.


See the other Hidden Tang Knives

Finishing the knife happened in small time slots over the next few days. I basically made the frame the same as I did for Knife 34 – Hidden Tang Aluminum Framed on page 47.
With this frame I cut the slots all the way around the frame. I then epoxied the handle together with epoxy tinted black and let the epoxy cure. I then drilled a series of 1/8” holes for the brass pins and epoxied the pins in place. These are for both esthetics and strength holding the frame together.


At this point I heat treated the knife and after it cooled, I started the tempering process. While this was in process, I roughed out the scales.
And here is the mistake. I realized at this point I did not normalize the knife before I heat treated it. I didn’t want to risk anything going wrong with this knife after the work I’d out into it, so back to the forge.
Normalizing Your Knife
- When a knife is forged it needs to be normalized. Forging adds stress to the steel. If you research this, you will find it has to do with the grain structure of the steel. But for now, just know it needs to be done.
- Normalizing is a pretty simple process. Heat the metal to nonmagnetic then let it air cool. For most metals we’ll talk about in this book, doing this three times should do the trick. After annealing you can go straight to heat treatment.
- Typically normalizing is not required with stock removal but I recommend you normalize recycled steel. If in doubt, normalize.
I normalized the knife three times. Each time bringing the knife to non magnetic and then letting it air cool. I then heat treated it once again and tempered it with the normal two hours at 450 degrees with two cycles.
I debated at this point if I should go further on the handle or wait and get it all together. I decided it would be best (since the finger guard would be flush to the handle) if it was all formed to final shape together.
I decided to add some spacers and epoxy the handle on. Since the clamp was positioned so I could drill for the tang pins, I went ahead and drilled and installed them as well. I then let it cure overnight.


________________
As an Amazon associate, we earn income from qualifying purchases when you click on a link. Your link clicks help us fund our website.________________
[…] Brut de Forge Bowie was forged from a similar tine as Knife – 42 Hunter Forged from an Implement Tine. To the right it is […]